


Remix IDE helps in compiling small smart contracts. This reference of Remix IDE layout gives us great insight on components of IDE.
deploy & run transactions
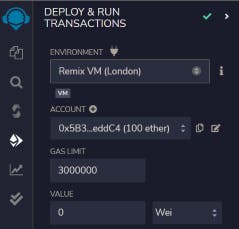
Environment provides multiple options to run contracts. One of them is Remix VM(London) which acts as a fake local blockchain where we can simulate transaction quickly without having to go through on a test net. On each reload the old chain will be cleared and a new blockchain will be started. The old one will not be saved. The London refers to the London fork of Ethereum.
Account section has many accounts having associated with the current environment (and their associated balances). On the Remix VM, you have a choice of 5 accounts. If using Injected Web3 with MetaMask, you need to change the account in MetaMask. Each account has 100 eth.
Gas limit section allows us to use gas on while doing transactions or deployment.
Value section has wei, gwie , finny , ether. These are denomination for ether. Values are entered to send amount to contract or a payable function.
Contract section shows the option of contract that we would like to deploy.
Deploy button allows us to send transaction to current environment. Deployed contracts contain all the functions, variables those are made public or having different conditions set onto them.
This link gives us all the required information about deployed contracts.
All the necessary details of the deployed contract are shown in the terminal of the remix ide. On fake blockchain we are given an address and every single deployed contract has an address just like our wallets has an address. Anytime we are modifying any value or making changes in contract, we are sending a transaction. If we make any changes in the contract then we have to deploy it again meaning every time payment has to be made for sending a transaction.
We can also send transaction from our wallet by changing the environment from remix vm to injected provider. So when injected provider is selected we have to connect our wallet to deploy the contract. In the wallet, test network is chosen and it should contain enough amount to pay for the transaction. We can use different faucets for different test networks and then we can confirm our transaction. After that we can view the transaction details on the etherscan link. This link is provided in the terminal of remix ide. Etherscan is a block explorer for the Ethereum blockchain. It provides information about each transaction and block, such as the hash and timestamp.